


Snowflake have gained in popularity being a platform that offers data storage and its processing in cloud. And the trends also got reflected in the EDP design patterns (Enterprise Data Platform), Snowflake is getting mapped as the recommended DW layer or as a query engine to the data lake or even transformation engine for the data lake. And With Apache Spark we can build highly scalable data ingestion pipelines connecting to a wide variety of sources, thanks to the extensive list of connectors available.
In this post I would like to walk you through the steps that happens behind the scenes during the writes to Snowflake using Spark-Snowflake Connector with Internal Transfer Mode. Understanding the detailed mechanics of the write, helps in understanding the purpose of snowflake mapping properties and its impact and the options for tuning the writes by knowing which engine(Spark or Snowflake) is used for each step.
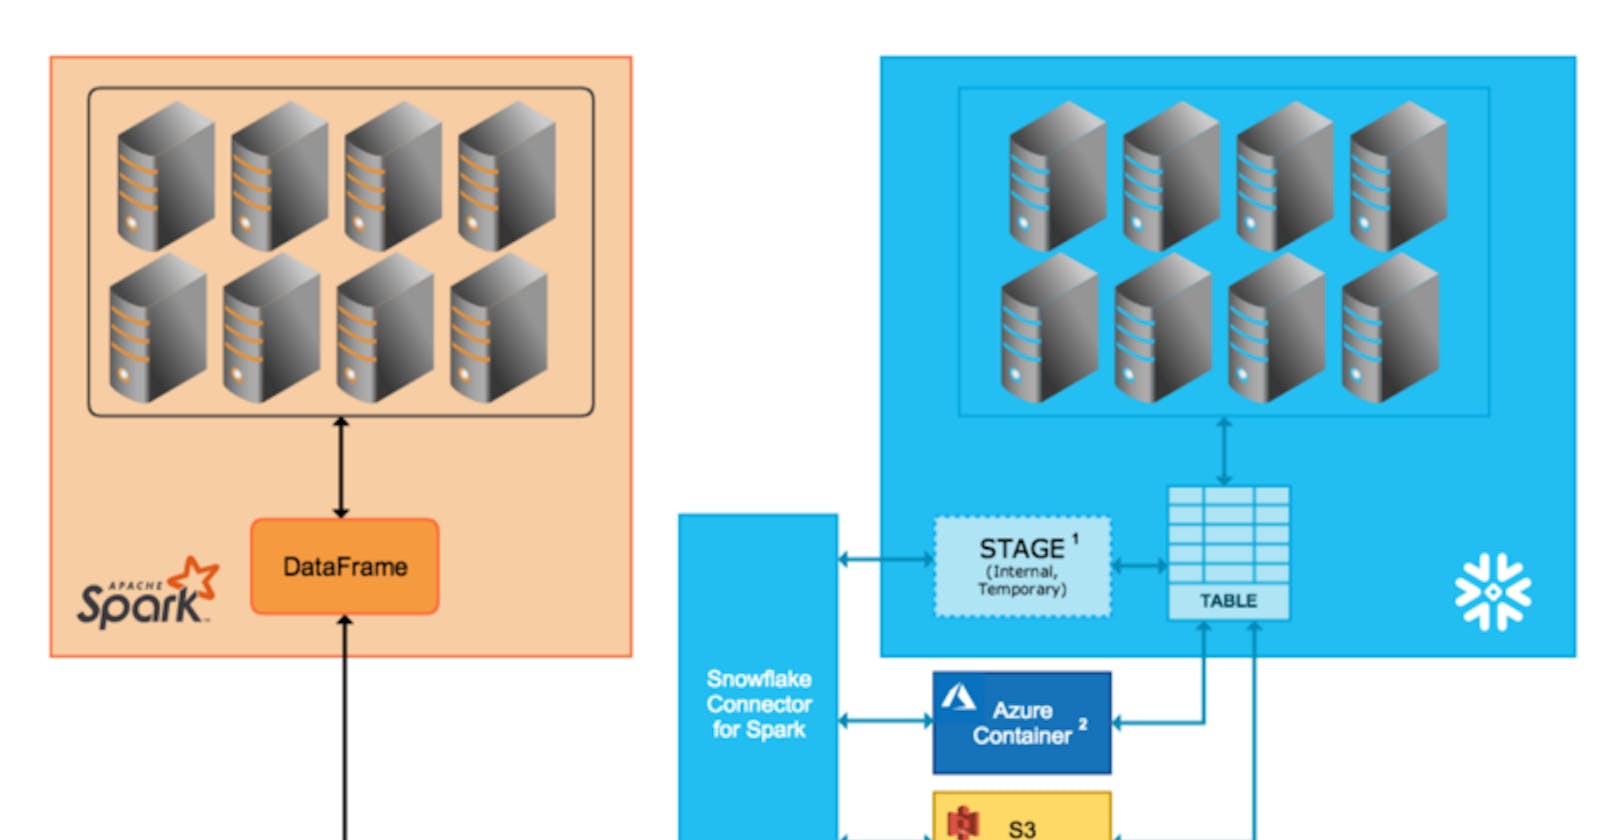
Courtesy : docs.snowflake.com
Snowflake supports 2 transfer modes
- Internal Transfer — Uses Snowflake internal stage which is a temporary location created and managed by Snowflake which have the life until the Snowflake session is active. This transfer mode is recommended by Snowflake unless the data transfer may take more than 36 hrs(As the temporary credentials to access the stage area expires after 36 hrs).
- External Transfer — Here the staging area will be created and managed by the user itself(S3/Azure Blob Storage).
Following are the steps that spark have abstracted for us with the save action
df.write \
.format(SNOWFLAKE_SOURCE_NAME) \
.options(**sfOptions) \
.option("dbtable", "").mode("overwrite").save()
- Set time zone. Here my spark time zone is UTC

2. Create temporary internal stage in Snowflake.
From Snowflake documentation:
TEMPORARY STAGE— Specifies that the stage created is temporary and will be dropped at the end of the session in which it was created.
When a temporary internal stage is dropped, all of the files in the stage are purged from Snowflake, regardless of their load status. This prevents files in temporary internal stages from using data storage and, consequently, accruing storage charges. However, this also means that the staged files cannot be recovered through Snowflake once the stage is dropped.

Spark log

Snowflake query
3. Fire GET statement(which is used to get data files in the stage to the spark dummy location(in client machine)).But here this is just for the validation of stage metadata.

4. Upload the spark partitions to the snowflake internal stage.

Executor Logs

5. Check whether the table already exist in snowflake. If not, table will be created in the next steps.

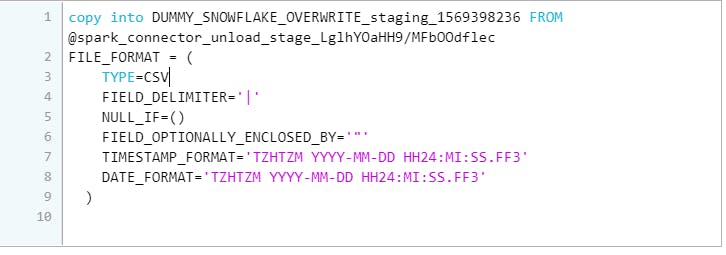
6. Create staging table — In my example the “usestagingtable” was turned on by default, Snowflake strongly recommends the usage of staging tables, because in the scenarios where data load fails, the staging table will be dropped and target(the actual table) will have the original data retained. In other words use of staging table avoids partial writes in the target table.

7. Copy staging files in Snowflake internal stage into staging table(DUMMY_SNOWFLAKE_OVERWRITE_staging_1569398236) created in previous step

Spark log
Snowflake query
8. Describe table again to see which option should be used to create the final table — RENAME/SWAP. RENAME if the ‘desc table’ fails else SWAP

9. Once the data has been successfully loaded in the DUMMY_SNOWFLAKE_OVERWRITE_staging_1569398236, rename the table to the actual table name

Spark log — RENAME for the first time overwrite

Snowflake Query — RENAME for the first time overwrite

Spark log — SWAP for the subsequent overwrite runs
10. Remove the data files from the Snowflake internal stage. Please note that the stage is active only during the session as it is “TEMPORARY internal stage”. For instance all the above queries has been executed in the same session with session id — 13233185106604254.

Note
Incase of append mode, note that the records will be directly written to final table rather that using a staging table. Incase of an error the transaction will be rolled back using “ROLLBACK”

Successful append
For more details on the internals, refer spark-snowflake project in Github:
[GitHub - snowflakedb/spark-snowflake: Snowflake Data Source for Apache Spark.
The main version of spark-snowflake works with Spark 2.4. For use with Spark 2.3 and 2.2, please use tag…github.com](https://github.com/snowflakedb/spark-snowflake "github.com/snowflakedb/spark-snowflake")
Reference for Spark - Connector usage :
[Snowflake Connector for Spark - Snowflake Documentation
The Snowflake Connector for Spark ("Spark connector") brings Snowflake into the Apache Spark ecosystem, enabling Spark…docs.snowflake.com](https://docs.snowflake.com/en/user-guide/spark-connector.html "docs.snowflake.com/en/user-guide/spark-conn..")